Whenever you buy a security device, installation is the fundamental step. Likewise, the
Reolink Camera Installation ensures that you get the most out of this reliable and secure surveillance system. Whether you are installing it outdoors or inside your premises, you need to know the proper instructions to ensure its optimal performance and monitoring.
Therefore, in this expert guide, we will walk you through the stepwise procedure of How to Install Reolink Camera in a simplified manner. Additionally, this guide teaches you the key requirements and two effective methods to carry out this procedure seamlessly. So, follow along for quick instructions!
Reolink Camera Installation- Stepwise Instructions!
Installing Reolink POE Camera is one of the prerequisites to ensure a better user experience. However, different Reolink cameras have different installation procedures. It also varies as per the device model and type of the mount.
In this section, we elaborate on the POE Reolink Camera Installation. This type of camera is mainly installed in two ways, i.e., with the wall mount and ceiling mount. If you are interested in learning these procedures step by step, then go through the below instructions:
How to Install Reolink Camera on the Wall?
- Firstly, unpack the Reolink security camera.
- Match all the components with the quick installation guide.
- Then, ensure all the components are working fine.
- Now, prepare the essential things for the camera installation.
- After that, find a suitable place to mount your camera.
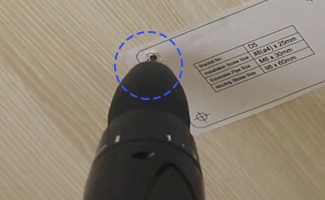
- Next, drill the holes in the wall relevant to the mounting plate.
- Now, secure this mounting plate with the screws and tighten it using a screwdriver.

- Place the camera on the mounting plate.
- Now, attach the camera near to the lower screw.
- Hereon, adjust the camera’s angle and field of view.
- Now, fix the camera to keep it still for an ideal view.
- Finally, you are done with the Reolink Camera Installation process.
Installing Reolink POE Camera With Ceiling Mount

- Primarily, unpack your device and prepare the essentials.
- Now, drill the holes corresponding to the mounting plate.
- After that, securely attach the mounting plate on the ceiling with two screws.
- Next, hang the Reolink camera on this plate.
- After that, fix the position of the camera with the lower screws.
- Hereon, adjust the camera view by loosening the adjustment screws.
- Once you get an ideal field of view, fix the camera properly and tighten the screws.
- Now, you can start using the Reolink POE camera.
Final Words
At last, this guide concisely elaborated the Reolink Camera Installation process. Now, you have learned two different ways to install your security camera. Hopefully, you are enjoying a great field of view with your Reolink security camera.